Thursday, May 28, 2015

My Creative Time: Do Over Thursday

Hi, today is Do Over Thursday over on the My Creative Time blog! 

I didn't dislike my first birthday bag but I wanted go in a different direction this time. I wanted to use a similar tag the first time, however, it covered up too much of the sentiment and at the time, I was dead set on using that particular stamp. So now on to my revised birthday bag.


I found these two pack gift bags at Michael's in the dollar section and just new I wanted to eventually make something with them. I love the pattern with the beautiful coral with a hint of gold, pink, and white! So I cut them down as I had with my other bag to be able to fit them into my Cuttlebug. Then I cut out two bag pieces using the new Chalkboard Birthday Stamp and Die set

I cut out a Vellumn label using a die from the Love To Learn set. I then stamped on the word art birthday sentiment also from the Chalkboard Birthday Stamp and Die set. I used Versamark ink along with Recollection's Gold embossing Powder. I glued the corners down with Glossy Accents and then covered them up with tiny stars from the 4x4 Journal Die and More set

I first used the candle cupcake outlined die from the new Light the Candles stamp set to create the gift tag base. I then used the other cupcake dies along with the cupcake stamp to create the rest of the cupcake for the tag. I colored the candle in with Copic markers. I also used the Versamark ink and Recollection's Gold embossing powder to stamp on the sprinkles and candle. I stamped on the inside of the cupcake tag using the Just Tags Stamp and Die set. 

I added the handles that I cut off of the bags and glued the bag together. I tied the tag to the handle with some gold twine I had in my stash. I then added a lot of tissue paper this time. I wish I would have used more on my first bag. 


Here was my first birthday bag I created for the May release.


Thank you so much for stopping by!! For more design team inspiration please head on over to Miss Emma's Blog. 


Tuesday, May 19, 2015

My Creative TIme: Tag It Tuesday


Hello, today is Tag It Tuesday over on the My Creative Time blog. I'm sharing a sweet tag made with one of the super cute ice cream cones from the 43rd edition release. 


For my tag base, I used Tag Dies and Tag Die Layers. Then I cut out all the elements of the ice cream cone using the dies from the new You Make Life Sweet set. I stamped on the cute Peachy Kawaii face onto the ice cream cut out. I colored the tongue in with a Copic marker and added white gel pen accents. I also used Inkadinkado chalk ink. I glued it all together and added Glossy Accents to the cherry.


I stamped the sentiment, also from You Make Life Sweet set, onto a layered label from the Fun Stitched Tag Dies. I added hearts to the label using the cute little hearts from the new We're Better Together set. I added Glossy accents to them as well. 

After I tied the ribbon to the top of the tag, I added a cute little heart from the 4x4 Journal dies and more set. I added a smaller heart from this set onto the cone. I added Glossy Accents to both of them as well.


On the back of the tag I cut out the Tag Gift Pocket die. I then used Versamark ink and Recollection's Snow embossing h powder to add the sentiment from the to the Fun Gift Pocket Sentiment stamp set. I adhered it to the back of the tag and then added a yummy gift card! I put the pearlized sequins all around the gift pocket and then added them to the front to match.

Thank you so much for stopping by!! For more design team inspiration please head on over to Miss Emma's blog. 


Friday, May 15, 2015

My Creative Time: 43rd Edition Release Blog Hop

Welcome to the My Creative Time's 43rd Edition Release Blog Hop! 

If you have made it here from Cindy's blog then you are in the right place. If you have just stopped by or have gotten lost along the way please head on over to Emma's Blog for the full hop order.

For today's hop, I have created a "doggy bag" showcasing the mini gift bag die from the new "Chalkboard Birthday" stamp set. 


I used the mini gift bag die to cut out two bag pieces. Then I stamped two sizes of paw prints along with the dog bone stamp, from the Live Love Barkto create a fun dog pattern on the gift bag. 

I then cut out two adorable little doggies from the Loyal Friends stamp set. I inked the edges using Memento Sand ink. I stamped on the nose from the same set and then added the cute eyes/mouth from the new "You Make Life Sweet". Love when Emma comes out with more cute little faces! I chalked his cheeks with Inkadinado chalk ink and added white gel pen accents to his face. Then I cut off the head and pop dotted it onto another body to add a bit of dimension to the dog.  I finished his look by adding the cute little bow from the You Had Me At Meow stamp set.


I then stamped the sentiment onto the dog bone die cut. They both are also from the Live Love Bark stamp set. I glued the dog bone onto the bag and then glued the little dog onto it as well. It almost looks like a dog is sitting on a couch/bed. 

I then cut out the two little hearts from the new "We're Better Together" stamp set and added them to the dog bone.


I then strung ribbon I had from my stash into the handle holes on both sides. I added a bit of tissue paper on the inside to complete the gift bag look. I just love how cute my doggy bag turned out!! 


All my sneaks using this fabulously sweet release!!

"FREEBIE STAMP"


UPDATEON FREEBIE!!!
Our 150th shopper came throughALREADY! Actually it went a little over because I had to take the boys to school so I wasn't here to see it! ;)  So, if your invoiceNUMBERS are between 159171 - 16131 you are the LUCKY shoppers who will be getting this SUPER SWEET set in your happy mail! If you missed out on the FREEBIE, no worries because it isAVAILABLE for purchase HERETHANK YOU ALL SOOO VERY MUCH!!!! xoxo


***BLOG HOP GIVEAWAY***
For our blog hop giveaway, Emma is giving away a $50 gift card to the "My Creative Time" store to ONE LUCKY winner! ALL you have to do is leave a comment on each of our blogs! You are NOT required to comment on EVERY SINGLE blog, but the more you comment on, the MORE chances you have for winning! VERY IMPORTANT, PLEASE leave a way for us to contact you w/your comment just in case "YOU" are the lucky winner!   

***SALE ALERT***

ALSO, DON'T FORGET our sale starts RIGHT NOW here: http://shop.my-creative-time.com/New-Release_c40.htm! Use the code: MAY2015 to receive a discount off your entire purchase! This sale applies to "IN-STOCK" items ONLY. This sale will end on Friday, May 22nd @midnight PST.  Friday, May 15thMCT 43rd Edition Release Blog Hop! 

Thank you so much for stopping by!! Have a wonderful day!! Please hop on over to Jessica's blog!

Thursday, May 14, 2015

My Creative Time: 43rd Release: Sneak Peeks Day #4

Hi, welcome to the 4th and final day of sneak peeks for the My Creative Time's 43rd Edition Release.  Today we are showcasing the fun new, "Chalkboard Birthday" stamp set. This set has so many fun birthday word art stamps that are great for all your birthday projects! Plus, it has a cute mini gift bag die! It is so adorable!


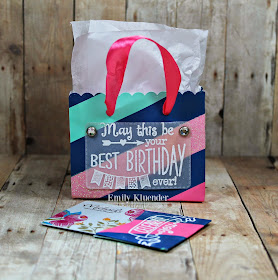
This project was so easy to put together in no time! It would be perfect for Made in Minutes. I just happened to have this pretty gift bag just sitting in my gift wrapping bin and thought it would be fun to upcycle it into this mini gift bag. 

I had to cut down the original bag into sections that would fit in my Cuttlebug. I then proceeded to cut out two of the mini gift bag parts using the new die from the "Chalkboard Birthday" set. I adhered them together and then ran the coordinating ribbon through the bag for the handles. 

I stamped on the word art sentiment onto a Vellum cut out  using Versamark ink along with Recollection's Snow embossing powder.  The Vellum rectangle cut out was cut using a die from the Love to Learn stamp and die set. I attached it to the bag using a couple of diamond brads. I cut a small piece of tissue paper I had on hand to put in it to give it the true look of a gift bag.

I stamped on another fabulous word art sentiment onto the Tag Gift Pocket that cut out of the same bag. Then I put in a crafty gift card to Michaels. It fits perfectly in the little bag! A cute way to give candies and gift cards!


***Sneak Peek giveaway!***We will be giving away the sets we are showcasing each day to ONE lucky winner! For example, the set we are showcasing on Wednesday, Emma will announce the winner of that on Thursday & the sets we are showcasing on Thursday, Emma will announce that winner on Friday in her video!ALL you have to do is leave a comment on each of our blogs! You are NOT required to comment on EVERY SINGLE blog, but the more you comment on, the more chances you have for winning! VERY IMPORTANT, PLEASE leave a way for us to contact you w/your comment just in case "YOU" are the lucky winner! For EXTRA entries, you can spread the word about this release on Facebook, tweet about it OR even instagram it! #mycreativetime!GOOD LUCK EVERYONE & let's start spreading the word!;)  

Thank you so much for stopping by!! For more DT inspirations please head on over to Miss Emma's Blog


Wednesday, May 13, 2015

My Creative Time: 43rd Release: Sneak Peeks Day #3

Welcome to day #3 of sneak peeks for the My Creative Time's 43rd Edition Release! Today, we are showcasing the super sweet stamp set, "You Make Life Sweet". These ice cream cones are so adorable along with the cutie patootie faces Emma has included.


I first stamped and paper pieced the trio of ice cream cones in the Neapolitan colors. One of my favorites ice creams to get! Then I stamped on the adorable faces. I added chalk ink to the faces along with white gel pen accents using a White Gelly Roll pen.

I created my card base along with the mat layers using the Stitched Rectangular Frame dies. I then pop dotted my ice cream trio onto the white mat layer. Then I added a little American Crafts twine bow to each cone.

I stamped on the sentiment also from the new "You Make Life Sweet" onto a large Trio Stitched Banner that I cut smaller so it didn't cover up all of the cones. I finished my card by adding two little sequins from my stash to add a bit of sparkle. I just love how cut these ice cream cones are with those sweet faces!!


***Sneak Peek giveaway!***We will be giving away the sets we are showcasing each day to ONE lucky winner! For example, the set we are showcasing on Wednesday, Emma will announce the winner of that on Thursday & the sets we are showcasing on Thursday, Emma will announce that winner on Friday in her video!ALL you have to do is leave a comment on each of our blogs! You are NOT required to comment on EVERY SINGLE blog, but the more you comment on, the more chances you have for winning! VERY IMPORTANT, PLEASE leave a way for us to contact you w/your comment just in case "YOU" are the lucky winner! For EXTRA entries, you can spread the word about this release on Facebook, tweet about it OR even instagram it! #mycreativetime!GOOD LUCK EVERYONE & let's start spreading the word!;)  


Thank you so much for stopping by! For more design team inspiration please head on over to Miss Emma's fabulous blog. 

Tuesday, May 12, 2015

My Creative Time: 43rd Release: Sneak Peeks Day #2

Hi, and welcome back for day 2 of sneak peeks for the My Creative Time's 43rd Edition Release. Today, we are showcasing the fun new "Light the Candles" stamp set.


I went to a birthday party recently where they gave out cupcakes in these little goody bags. They said they had gotten the idea off of Pinterest. So when Emma showed us these adorable little cupcakes, I just knew I wanted to create some cute tags along with some yummy cupcake goody bags. 

I first cut out the tag layers using the Just Tags dies. I then stamped on the sentiment from the new stamp set, "Better Together"

I then cut out all the pieces for the cupcake using the dies from the new "Light the Candles" stamp set. I colored the little sprinkles using Copic markers. I also added Glossy Accents to the cherry.

I then added two hearts to both sides of the cupcakes using dies also from "Better Together" set.


My youngest son and I made these yummy cupcakes. I frosted them and he added the sprinkles! Once they were finished I placed them in plastic cups I got from the Dollar Tree and then I wrapped them in the clear bags from the Dollar General. A cheap but great way to give out cupcakes without all the mess.

I strung American Crafts Twine through the tags and then tied them onto the goody bags! Now we can give them away and hopefully make someone's day!

***Sneak Peek giveaway!***We will be giving away the sets we are showcasing each day to ONE lucky winner! For example, the set we are showcasing on Wednesday, Emma will announce the winner of that on Thursday & the sets we are showcasing on Thursday, Emma will announce that winner on Friday in her video!ALL you have to do is leave a comment on each of our blogs! You are NOT required to comment on EVERY SINGLE blog, but the more you comment on, the more chances you have for winning! VERY IMPORTANT, PLEASE leave a way for us to contact you w/your comment just in case "YOU" are the lucky winner! For EXTRA entries, you can spread the word about this release on Facebook, tweet about it OR even instagram it! #mycreativetime!GOOD LUCK EVERYONE & let's start spreading the word!;)  
Thank you so much for stopping by!! For more design team inspiration please head on over to Miss Emma's Blog. 

Monday, May 11, 2015

My Creative Time: 43rd Release: Sneak Peeks Day #1

Hello, I hope you all are ready for the My Creative Time's SWEET 43rd Edition Release!! Miss Emma has really out done herself once again!! You all are going to love these new goodies!!

Today, we are sneaking the brand new "Better Together" along with this month's awesome freebie stamp set, "Sweet Wishes"


I first cut out the cute little Milk Carton in Recollection's Kraft card stock. Then I cut the circle out using one of the new dies from the " Better Together" stamp set. I then added vellum on the inside of the circle. I used the circle I had cut out of the milk carton along with a couple other dies to complete the look of the frosted doughnut with sprinkles. I finished it by adding white gel pen stitching to the edges of the circle. 

I then cut out the tag and stamped on the outlined from the Mini Chalkboard Tags stamp set. I also cut out a coordinating pink card stock tag from the Fun Stitched Tags die set. Then I stamped on the "You make life" sentiment in Tuxedo Black Memento ink. Next, I adhered the word "Sweet" also from the new freebie (Sweet Wishes) onto the tag. I added Stickles on it to add a bit of sparkle. Then I glued some more little sprinkles onto the tag and added Stickles to them as well. I finished by adding the tag to the milk carton with a mini Recollection's clothes pin with the American Crafts Twine on it. 


For the little sweet goodies, I purchased some mini Hostess Glazed Doughnuts. I then frosted them and my son helped me add some fun sprinkles to the top. We were able to fit two of the mini doughnuts in there. He is so looking forward to giving this fun treat to one of his teachers. 


***Sneak Peek giveaway!***
We will be giving away the sets we are showcasing each day to ONE lucky winner! For example, the set we are showcasing on Wednesday, Emma will announce the winner of that on Thursday & the sets we are showcasing on Thursday, Emma will announce that winner on Friday in her video!ALL you have to do is leave a comment on each of our blogs! You are NOT required to comment on EVERY SINGLE blog, but the more you comment on, the more chances you have for winning! VERY IMPORTANT, PLEASE leave a way for us to contact you w/your comment just in case "YOU" are the lucky winner! For EXTRA entries, you can spread the word about this release on Facebook, tweet about it OR even instagram it! #mycreativetime! GOOD LUCK EVERYONE & let's start spreading the word!;)  

Thank you so much for stopping by!! For more design team sneak peeks please head on over to Miss Emma's blog. 


Wednesday, May 6, 2015

MCT: What a Treat Wednesday

Hi today is What A Treat Wednesday over on the My Creative Time Blog


I had created this card earlier for my mom and wanted a little something to give her along with it. So I decided to make a little treat box that coordinated with her card. I first cut out the bottom of the Treat Slider Box using Recollection's Kraft card stock. Next, I cut out the top using Vintage Bliss pattern paper. I love these papers!! They are so pretty!! I then cut out the scallop strips to wrap around the Hershey's nuggets. I finished them up by stamping on the "love you" from the Puffy Hearts Just for You stamp set. 

I stamped the Enjoy the Little Things sentiment onto the Stitched Tag die. I then stamped it again onto pink card stock and cut out just the "the little things" banner. I glued it onto the original tag and then added Stickles to the edges. I also added a couple of sequins from my stash. Then I traced the tag on Kraft card stock and cut it out to create a layer for the tag.


I tied the tag on with the same ribbon I used on the card. Then I cut out a little flower from the Junior Rolled Flower dies. I inked the edges and added Stickles to the end of the petals as well. Then I glued it onto the center of the ribbon. 

Thank you so much for stopping by! For more amazing design team inspiration please head on over to Miss Emma's Blog!! Have a wonderful day!!