Wednesday, October 26, 2016

My Creative Time: What A Treat Wednesday

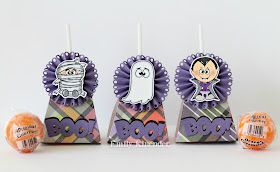
Hi, today is What A Treat Wednesday over on the My Creative Time Blog. I have some fun little Halloween Stitched Lollipop Holders to share. They are so easy to make and great to hand out for this upcoming holiday.


I cut out three Stitched Lollipop Holders in the Halloween paper. I then created three purple card stock Stitched Rosettes   The little mummy and ghost were stamped from the Too Cute To Spook Stamp Set and the vampire was stamped from the Fangtastic Day Stamp Set. To finish them, the little "Boo" die sentiment was added at the bottom.

Products Used:

Copic Markers
Paper Studio: pattern paper
Recollections: card stock
White Gelly Roll Pen
American Crafts: twine
Peachy Keen Stamps
Original Gourmet Lollipops

Thank you so much for stopping by!!

For more design team inspiration, please head on over to Miss Emma's blog

Friday, October 21, 2016

My Creative Time: 60th Edition Release: Blog Hop

Hello and welcome to the My Creative Time: 60th Edition Release Blog Hop.

If you have made it here from Brigit's blog then you are in the right place. If you have just stopped by or have gotten lost along the way, please head on over to Miss Emma's blog for the full hop order.

Today I am showcasing the new Santa Suit Dies. These dies will look great on all your Christmas cards, tags, and treats!


The little Santa Suit was glued onto a kraft card stock Stitched Postage Frame.  Then the sentiment from the Inside Christmas Cards, was added to the bottom of the frame using black embossing powder. The postage frame was then layered onto the pattern paper using a piece of vellum. The frames were both cut out using the Stitched Rectangular Frame Dies.

Products Used:
Santa Suit Dies
Inside Christmas Cards Stamps
Stitched Postage Frame Dies
Stitched Rectangular Frame Dies

Recollections: Card Stock
Bazzill: Sparkly Card Stock & Glitter Paper
Paper Studio: Vellum and Pattern Paper
Recollections: Black Embossing Powder
Versamark Ink
Clear Wink of Stella

MCT: 60th Edition Release Sneak Peeks


***FREEBIE DIE***


Starting THIS Friday, October 21st, 2016 @ 8am PST ~ Our "Freebie" for this release is this AWESOME "Inside Christmas Cards" Stamp set. It will be given to the FIRST 100 shoppers! If you are one of the 1st 100 shoppers it will be automatically added to your package at the time of packaging/shipping. Once 100 shoppers come through, this stamp set will be available for purchase. So, if it’s for sale in the store, you are not one of the 100. No exceptions will be made. This freebie set is not a part of the “bundle” and will be sold separately!

***BLOG HOP GIVEAWAY***
For our blog hop giveaway, Emma is giving away a $50 gift card to the "My Creative Time" store to ONE LUCKY winner! ALL you have to do is leave a comment on each of our blogs! You are NOT required to comment on EVERY SINGLE blog, but the more you comment on, the MORE chances you have for winning! VERY IMPORTANT, PLEASE leave a way for us to contact you w/your comment just in case "YOU" are the lucky winner!

***SALE ALERT***
ALSO, DON'T FORGET our sale starts RIGHT NOW here:http://shop.my-creative-time.com/Ne...! Use the code: OCT2016 to receive a discount off your entire purchase! This sale applies to "IN-STOCK" items ONLY. This sale will end on Fri, October 28th, 2016 @midnight PST.

Thank you so much for stopping by!!

Please hop on over to Miss Jessica's wonderful blog to see what she has created! 

Thursday, October 20, 2016

My Creative Time: 60th Edition Release: Sneak Peeks Day 4

Hi and welcome to day 4 of sneak peeks for the My Creative Time: 60th Edition Release. Today we are sneaking the You Deserve A Break Stamp Set. I decided to create a cute mug shaped card using this fun new set. 


The mug was cut out using dies from the new You Deserve A Break Stamp Set. The front was embellished with a Stitched Doily that is layered with a couple of Circle Die cuts. Then the sentiment, also from the You Deserve A Break Stamp Set, was added to the front. The little heart was cut out using a die from the Carved Heart Stamp Set. The heart was topped with Glossy Accents.

Products Used:
You Deserve A Break Stamp Set
Bunch of Stitched Doily Dies
Bunch of Fun Circle Dies
More Stitched Circle Dies
Carved Heart Stamp Set

Recollections Card Stock
Bazzill Card Stock
Glossy Accents


***Sneak Peek giveaway!***We will be giving away the sets we are showcasing each day to ONE lucky winner! For example, the set we are showcasing on Wednesday, Emma will announce the winner of that on Thursday & the sets we are showcasing on Thursday, Emma will announce that winner on Friday on my blog! ALL you have to do is leave a comment on each of our blogs! You are NOT required to comment on EVERY SINGLE blog, but the more you comment on, the more chances you have for winning! VERY IMPORTANT, PLEASE leave a way for us to contact you w/your comment just in case "YOU" are the lucky winner! For EXTRA entries, you can spread the word about this release on Facebook, tweet about it OR even instagram it! #mycreativetime! GOOD LUCK EVERYONE & let's start spreading the word!;)

Thank you so much for stopping by!

For more design team inspiration using today's sneak, please head on over to Miss Emma's blog

Wednesday, October 19, 2016

My Creative Time: 60th Edition Release: Sneak Peeks Day 3

Hi and welcome to day 3 of sneak peeks for the My Creative Time: 60th Edition Release. Today we are sneaking the fun new Inside Christmas Cards, which are the release freebie.


The card base was cut out using the Stitched Rectangular Frame Die.  The vellum Stitched Postage Frame Die that was embossed with a leaves embossing folder, was layered onto the card base. Next, the Stitched "Capture" Frame Die was cut out three times and layered onto the vellum. Then the captured frame was cut out again in red card stock. The negative was embossed with the same folder and then used to fill in the window of the white card stock frame. The little ornament and the greenery with bow, from the Fun Stitched Ornaments and More Stamp Set , were added to the top of the frame. To finish the card, the sentiment was stamped onto the frame from the Inside Christmas Cards.

Products Used:
Inside Christmas Cards (Release Freebie)
Fun Stitched Ornaments and More Stamp Set
Stitched Rectangular Frame Die
Stitched Postage Frame Die
Stitched "Capture" Frame Die

Cuttlebug Leaves Embossing Folder
Memento Tuxedo Black Ink
Recollections Card Stock
Bazzill Silver Glitter Paper
Paper Studio Vellum


***Sneak Peek giveaway!***
We will be giving away the sets we are showcasing each day to ONE lucky winner! For example, the set we are showcasing on Wednesday, Emma will announce the winner of that on Thursday & the sets we are showcasing on Thursday, Emma will announce that winner on Friday on my blog! ALL you have to do is leave a comment on each of our blogs! You are NOT required to comment on EVERY SINGLE blog, but the more you comment on, the more chances you have for winning! VERY IMPORTANT, PLEASE leave a way for us to contact you w/your comment just in case "YOU" are the lucky winner! For EXTRA entries, you can spread the word about this release on Facebook, tweet about it OR even instagram it! #mycreativetime! GOOD LUCK EVERYONE & let's start spreading the word!;)

Thank you so much for stopping by!!

For more design team inspiration using today's sneak, please head on over to Miss Emma's blog

Tuesday, October 18, 2016

My Creative Time: 60th Edition Release: Sneak Peeks Day 2

Hi and welcome to day 2 of sneak peeks for the My Creative Time: 60th Edition Release. Today we are sneaking the fabulous Santa Suit Dies. I decided to create a little treat bag with cookies for Santa using the new die set. 

The Stitched Treat Sleeve was cut out using a piece of parchment paper. Then it was embossed with a Large Snowflake Embossing Folder.  Next, the Stitched Belly Band was cut out in black card stock. The label added to the band was created by using the Stitched XL Label Die and the XL Label Die.  The sentiment was stamped onto the label from the Baked With Love Stamp Set. The fun little Santa Suit was then added to the front of the label. I was able to fit four little Chips Ahoy Chocolate Chip cookies in the treat sleeve. These would be so fun to make with the kids for Santa to leave for the night before Christmas.

Products Used: 
Santa Suit Dies
Stitched XL Label Die
XL Label Die
Stitched Treat Sleeve
Stitched Belly Band Dies
Baked With Love Stamp Set

Cuttlebug Large Snowflake Embossing Folder
Parchment Paper
Recollections Card Stock
Bazaar Silver Sparkle Paper
Memento 


***Sneak Peek giveaway!***
We will be giving away the sets we are showcasing each day to ONE lucky winner! For example, the set we are showcasing on Wednesday, Emma will announce the winner of that on Thursday & the sets we are showcasing on Thursday, Emma will announce that winner on Friday on my blog! ALL you have to do is leave a comment on each of our blogs! You are NOT required to comment on EVERY SINGLE blog, but the more you comment on, the more chances you have for winning! VERY IMPORTANT, PLEASE leave a way for us to contact you w/your comment just in case "YOU" are the lucky winner! For EXTRA entries, you can spread the word about this release on Facebook, tweet about it OR even instagram it! #mycreativetime! GOOD LUCK EVERYONE & let's start spreading the word!;)

Thank you so much for stopping by!!

For more design team inspiration, please head on over to Miss Emma's Blog

Monday, October 17, 2016

My Creative Time: 60th Release Edition: Sneak Peeks Day 1

Hi and welcome to day 1 of sneak peeks for the My Creative Time: 60th Edition Release. Today we are sneaking the wonderful Fun Stitched Ornaments & More Stamp Set  I decided to make the ornaments look like the large Christmas tree light bulbs. 


The ornaments/light bulbs from the Fun Stitched Ornaments & More Stamp Set were all cut out using yellow, red, green, and blue paper scraps. A white gel pen was used to create a reflection mark on each one and then they were topped with Glossy Accents. The light bulb string was created by using a die cut from the Fun Tweet Me Dies  The little heart was cut off and the lightbulb die cuts were strung along it. They were glued onto an aqua card stock Stitched Rectangular Frame Die cut. 

The little branches were cut out using a die from the Fun Stitched Ornaments & More Stamp Set. They were layered at the top of the card and then any edges that overlapped were cut off with scissors. The sentiment "Merry & Bright" from the All Is Calm Stamp Set, was stamped onto the bottom of the card. A red card stock layer was added to the back of the frame die cut and then a white gel pen was used to add faux stitching. The card was finished by adding some red sequins to the card. 

Products Used:
Fun Stitched Ornaments & More Stamp Set
All Is Calm Stamp Set
Stitched Rectangular Frame Dies
Fun Tweet Me Dies

Glossy Accents
White Gelly Role Pen
Mini Red Sequins
Card Stock Scraps
Recollections Card Stock
Bazaar Card Stock

***Sneak Peek giveaway!***
We will be giving away the sets we are showcasing each day to ONE lucky winner! For example, the set we are showcasing on Wednesday, Emma will announce the winner of that on Thursday & the sets we are showcasing on Thursday, Emma will announce that winner on Friday on my blog! ALL you have to do is leave a comment on each of our blogs! You are NOT required to comment on EVERY SINGLE blog, but the more you comment on, the more chances you have for winning! VERY IMPORTANT, PLEASE leave a way for us to contact you w/your comment just in case "YOU" are the lucky winner! For EXTRA entries, you can spread the word about this release on Facebook, tweet about it OR even instagram it! #mycreativetime! GOOD LUCK EVERYONE & let's start spreading the word!;)

Thank you so much for stopping by!!

For more design team inspiration using today's sneak, please head on over to Miss Emma's blog.


Wednesday, October 12, 2016

My Creative Time: What A Treat Wednesday

Hi todays is What A Treat Wednesday over on the My Creative Time Blog. I have a spectacular treat box to share that was decorated with some cute MCT products. 

I found this fun little coffin box at Michaels and thought it would be fun to see if the coffin dies from the Spooky Time stamp set would fit on it. Luckily, the smaller stitched coffin die cut fit perfectly on the top. 


The little Dracula from the Fangtastic Day Stamp Set was stamped and cut out using the coordinating die. He was colored in using Copic markers and accented with a white gel pen. The eyes were masked with tape on the original stamped image and new eyes were stamped on using Peachy Keen Stamps. I wanted to make him a little more silly than scary. He was finished by adding a bit of chalk ink to his cheeks. 

The Stitched Scallop Rosette was created by glueing two of the smaller rosette die cuts together. The front was covered up using a small Bunch of Fun Circle die cut. Next, a spooky spider web die cut was layered on the rosette, that was cut out using the Wicked Fun Dies. Then the Dracula was glued onto the center of the spider web.

The coffin front was then embellished with two little bats that were cut out also using the Wicked Fun Dies.  The little spider was stamped and cut out using a die from the Too Cute To Spook Stamp Set. The sentiment from the Fangtastic Day Stamp Set was added to the Vintage Stitched Label Die cut that fit the front of the coffin. 


You could fill the coffin with whatever treat you like but I decided to use a regular size Original Gourmet Lollipop. The stick had to be cut down in order to fit in the box. I then stamped and cut out the little mummy from the Too Cute To Spook Stamp Set. He was colored in with Copic markers and taped onto the front of the lollipop. 


Products Used:
Fantastic Day Stamp Set
Too Cute To Spook Stamp Set
Spooky Time Stamp Set
Stitched Scallop Rosette Dies
Wicked Fun Dies
Vintage Stitched Label Dies
Bunch of Fun Circle Dies

Recollections Card Stock
Paper Studio: Halloween Pattern Paper
Clear Wink of Stella
Copic Markers
White Gel Pen
Inkadinkado Chalk Ink
Memento Tuxedo Black Ink
Celebrate It: Chalkboard Coffin Box
Peachy Keen Stamps: Build Your Own Emojis Stamp Set

Thank you so much for stopping by!!

For more design team inspiration, please head on over to Miss Emma's blog.


Thursday, October 6, 2016

My Creative Time: Trending Now: Wood Pallets

Hi today is Whats Trending Now over on the My Creative Time Blog. Todays trend is using wood of any kind. Whether it be actual wood, wood impression, or paper that looks like wood. I decided to just create a card using paper that looks like wood for my little birdie card. 


The sweet little birdies were stamped from the Tweet Me Stamp Set and then cut out using the Fun Tweet Me Dies.  The little beaks and feet were colored in using a Copic marker. The eyes were accented with a white gel pen and topped with Glossy Accents. The tree limb and leaves was also cut out using the Fun Tweet Me Dies.

The light blue mat and the wood pattern paper mat were both cut out using two sizes of the Stitched Square Dies.  A white card stock base was added to the back of the mats. A vellum and white card stock circle was cut out using the More Stitched Circle Dies. The sentiment from the Tweet Me Stamp Set was stamped onto the white circle. To finish the card, a few sequins were added. 


Products Used:

Recollections Card Stock
Wood Grain Pattern Paper
Paper Studio: Vellum
Memento Tuxedo Black Ink
Copic Marker
Glossy Accents
Clear Pearl Sequins

Thank you so much for stopping by!!

For more design team inspiration, please head on over to Miss Emma's blog


Monday, October 3, 2016

My Creative Time: Made In Minutes

Hi, today is Made In Minutes over on the My Creative Time blog. I have a simple Halloween card to share that was made with some Spooktacular MCT products!


I first cut out the card base using the Stitched Square Dies. Then I cut out the bat pattern paper using a smaller square die. I then cut out a black card stock layer to go onto the back of the pattern paper. The moon was cut out using the Bunch of Fun Circle Dies and then the edges were inked with an orange ink. The hill was cut out using one of the More Stitched Edges Dies. The little cat and bats were cut out using dies from the Spooky Time Stamp Set. I added the sparkly eyes that were left over pieces from Mini Stitchd Lollipop Die to the cat. I finished the card by stamping on the sentiment from the Too Cute To Spook Stamp Set and added a few little silver sequins. 


Products Used:
Too Cute To Spook Stamp Set
Spooky Time Stamp Set
Stitched Square Dies
Bunch of Fun Circle Dies
More Stitched Edges Dies
Mini Stitchd Lollipop Die

Recollections Card Stock
Bazzill Glitter Card Stock
Bat Pattern Paper
Recollections Snow Embossing Powder
Versamark Ink
Memento Tangelo Ink
Small Silver Sequins

Thank you so much stopping by!!

For more design team inspiration, please head on over to Miss Emma's blog.
My Creative Time: Made In Minutes

Hi, today is Made In Minutes over on the My Creative Time blog. I have a simple Halloween card to share that was made with some Spooktacular MCT products!


I first cut out the card base using the Stitched Square Dies. Then I cut out the bat pattern paper using a smaller square die. I then cut out a black card stock layer to go onto the back of the pattern paper. The moon was cut out using the Bunch of Fun Circle Dies and then the edges were inked with an orange ink. The hill was cut out using one of the More Stitched Edges Dies. The little cat and bats were cut out using dies from the Spooky Time Stamp Set. I added the sparkly eyes that were left over from a project to the cat that were cut out using the mini stitched lollipop holder die. I finished the card by stamping on the sentiment from the Too Cute To Spook Stamp Set and added a few little silver sequins. 


Products Used:
Too Cute To Spook Stamp Set
Spooky Time Stamp Set
Stitched Square Dies
Bunch of Fun Circle Dies
More Stitched Edges Dies

Recollections Card Stock
Bazzill Glitter Card Stock
Bat Pattern Paper
Recollections Snow Embossing Powder
Versamark Ink
Memento Tangelo Ink
Small Silver Sequins

Thank you so much stopping by!!

For more design team inspiration, please head on over to Miss Emma's blog.